
Created a wonderful presentation and wish to transform it to a DVD? This guide is all you need! Here we will show you detailed steps to burn PowerPoint presentations to DVD on Windows or Mac in 2 different ways. If you want to create a professional-looking video DVD that can be auto-played on any DVD player, follow Method 1; If you simply need to burn the original PPT files onto DVD for sharing between computers, jump to the Method 2.
Contents
- Things You Need to Prepare
- Method 1: Burn a PowerPoint Video to DVD for DVD Players
- Method 2: Burn Presentation files onto CD/DVD Directly
Things to Prepare
- Blank DVD disc. DVD-R is recommended as it’s compatible with most DVD players and burners.
- Disc Burner. You need a built-in or external optical drive to write content onto disc.
- DVD burning software for burning a video DVD. Consider options such as Cisdem DVD Burner, Imgburn, etc.
How to Burn PowerPoint Presentation Video to DVD
This method is to burn your presentation to DVD as a video and make it playable on standalone DVD players including the old ones.
Step 1. Save Your Presentation to Video
There are two ways to save your presentation to a video, one is to via direct export, another is via recording.
How to export your PowerPoint as a video:
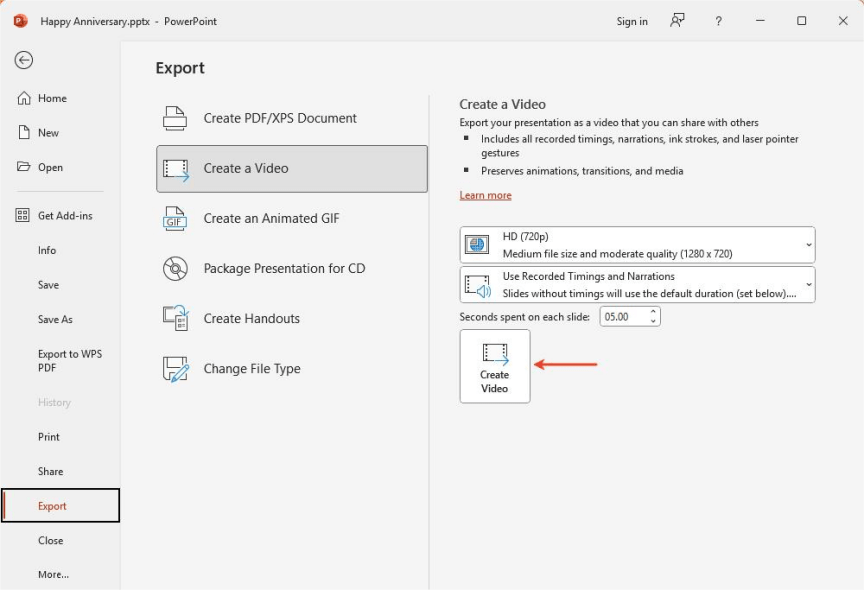
- Click File > Export > Create a Video in PowerPoint.
- Choose the output quality with options from 480p to 4K. HD (720p) is recommended since DVD video is typically displayed in 720×480 (NTSC) or 720×576 (PAL).
- Set the time spent on each slide.
- Click Create Video to convert your PPT to MP4 or WMV video.
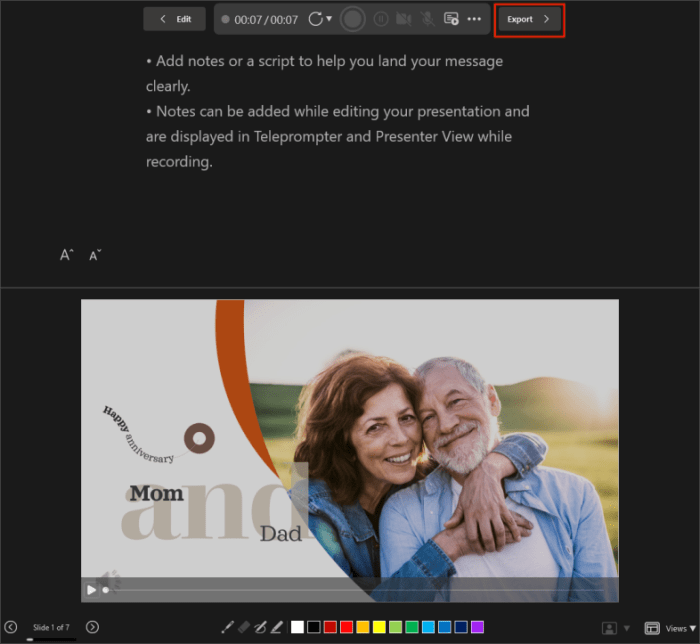
Alternatively, record and export your presentation to video:
Recording allows you to manually control the time spent on each slide, record narration while presenting and add notes.
- Go to the Record tab in PowerPoint, and select record From Beginning.
- Play the presentation as you like.
- When recording is finished, click Export in the top right.
- Select a save location, and click Export Video button.
Step 2. Burn the Video to DVD
Now you have the video version of your presentation, then you need a dedicated DVD authoring software to burn it to DVD. Cisdem DVD Burner is a top-rated choice that can convert various videos such as MP4, WMV, MOV and MKV to DVD format and burn to DVD on Windows or Mac without any hassle.
What’s more, Cisdem DVD Burner comes with a built-in DVD menu creator, providing dozens of stylish menu templates and customizable elements including background image and BGM, texts, buttons, frames and more. So here let’s use it as the example tool to burn the DVD.
- Insert a blank DVD in the disk drive of your computer.
2. Download and install Cisdem DVD Burner on your Windows or Mac computer.
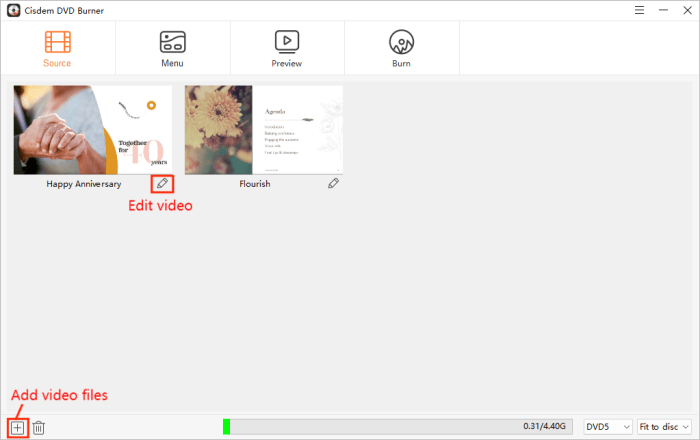
3. Launch the software, drag and drop your presentation videos (.mp4/.wmv) to the Source interface. If you need to, click the pencil icon to edit the video by trimming, cropping, adding subtitles/chapters, and more.
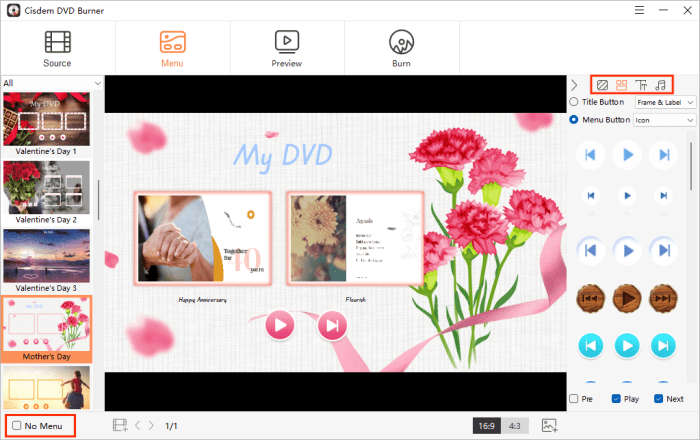
4. Go to the Menu tab, select a menu template from left side, and custom it with the right-side toolbar. Or, tick ‘No Menu’ at bottom left corner if you don’t need a navigation menu for your DVD.
5. Next, go to the Preview tab and preview the whole DVD playback in a remote mode.
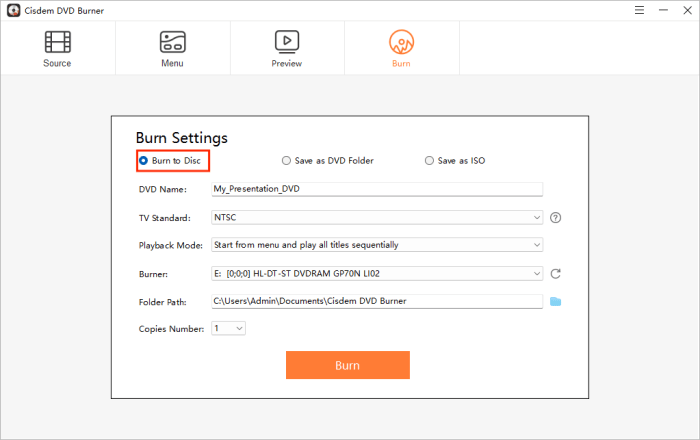
6. Go to the Burn tab to configure burning settings. Necessary settings include: select the connected drive as the Burner; choose NTSC or PAL as the TV Standard (click the question-mark if you’re not sure about your country’s standard), choose a preferred playback mode.
7. Finally, click the Burn button to start the converting and burning process.
Burn PowerPoint Presentation Files onto DVD/CD
This method is to use DVD disc like flash drive – store the presentation files to transfer and open them on most computers for viewing or editing. So you can also use a CD disc. No third-party software required.
On Windows
- Insert a blank recordable DVD, click the notification and choose “Burn files to disc”.
- A Burn a Disc dialog will pop up and prompt you to choose how you want to use the disc, such as like a USB flash drive, which lets you edit or remove files on the disc.
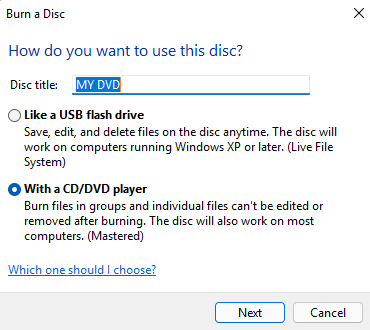
- Name the disc title and click Next.
- When it finished formatting the disc, open the DVD drive in File Explorer, and add your PowerPoint presentation file to it.
- Eject the disc to finishing burning.
On Mac
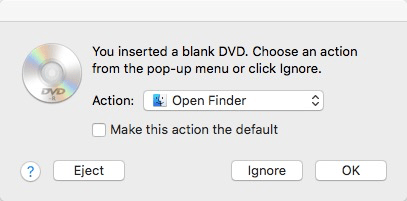
- Insert a blank recordable DVD into the drive.
- From the pop-up menu, select Open Finder action, and click OK.
- Drag and drop your PPT file into the DVD folder.
- Press the Burn button on the top right of the window.
- Enter the Disc Name, and click Burn to start burning the PowerPoint file to DVD on Mac.
This allows you to open and view the presentation on other computers but you can’t make changes to it after the disc is burned.
Final Words
You might wonder why can’t we burn a presentation video to DVD using steps in Method 2. Actually you can try, but most standard DVD players only accept DVD-video format with special codecs and structure, and they can’t read common digital formats such as MP4 and WMV. Using a professional burning software like Cisdem DVD Burner helps to avoid playback issues. No matter which tool you choose, it’s always a good idea to prepare several discs and do a test burn before burning the final DVD disc.