Do you have an iPhone filled with memories, music, or essential documents, but struggling to transfer them to your PC? You can easily move the data across devices if you know the right ways, which we’ll uncover in this article. Whether you prefer old school ways like cables and iTunes, or modern options, you’ll know seamless ways to transfer files from iPhone to PC.
Part 1. Why Transfer Files from iPhone to PC?
When you are dealing with iPhone data transfer to PC, you need to know what raises the need for data moving by reviewing the listed reasons:
- Free Up iPhone Storage: iPhones tend to run out of space as photography, 4K videos, music, and documents consume a lot of memory. Therefore, transferring them to PC releases the storage and makes your phone quick and slick.
- Backup and Data Security: No one would want to lose important memories or work documents in case their phone is lost, stolen, or accidentally reset. Therefore, when transferring the vital data to a PC, you can simply make a safe backup, not within the iPhone.
- Easy to Edit and Manage Content: PC is more advantageous to access and manage all files than phones. Besides, you can easily edit photos, trim or combine videos, or arrange files in folders.
- Move Large or Multiple Files: As a photographer, you need to transfer hundreds of photos or large video files simultaneously to your client. Therefore, bulk transferring can be done on a PC without delays or file size limitations.
- Share Data Anywhere: When you have files on a PC, you can easily share them with others, print documents, or transfer them to external drives. A PC, unlike an iPhone, allows you to migrate your data wherever you want according to your needs.
Part 2. 6 Reliable Methods to Transfer Files from iPhone to PC
For iPhone to Windows file transfer, review the listed ways and select the one that suits your expertise for effortless data sharing:
Method 1. MobileTrans – The Most Simplified Solution
As an easy solution, MobileTrans allows you to share 5 data types, such as photos and videos, from iPhone to PC securely. While doing so, users can choose multiple data types and share data to a PC in bulk in just a few steps. Using this tool is simple for both beginners and professionals, and allows you to establish a secure USB connection.
Additionally, the tool is compatible with over 6,000 mobile devices (running on Android and iOS systems) and can be accessed on both Mac and PC. Other than being compatible, MobileTrans also enables you to move apps from one device to another without any loss.
Key Features
- Phone to Phone Data Transfer: You can move up to 18 types of data between Android – Android, Android – iOS, iOS – Android, or iOS – iOS.
- Seamless Transfer: With MobileTrans, there is no need for a cloud account or internet connection for local transfers.
- Transfer WhatsApp/WhatsApp Business Data: This innovative tool allows you to move WhatsApp or WhatsApp Business chats, stickers, photos, videos, files, contacts, and more.
Detailed Guide to Move Data from iPhone to PC – Simple Solution MobileTrans
After knowing the phone-to-phone transfer or phone to PC features of this tool, learn how it makes iPhone to PC file transfer easier:
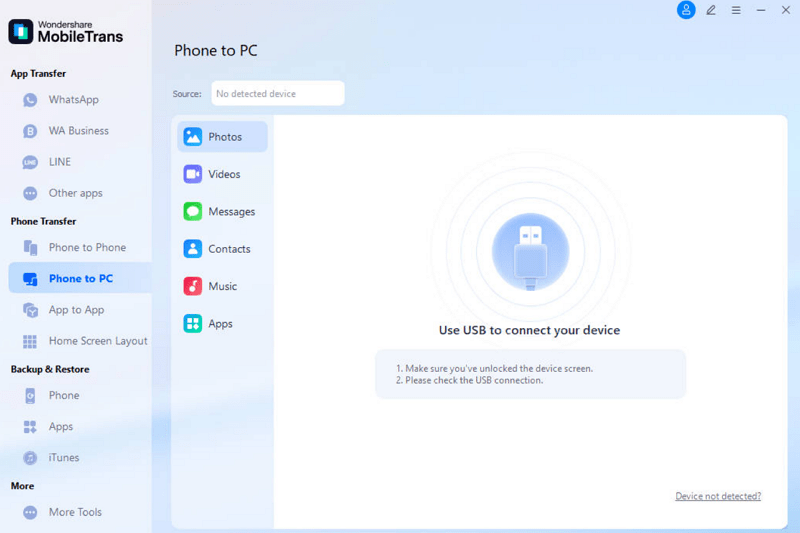
Step 1. Launch MobileTrans and Choose Phone to PC Tool
Connect the iPhone to PC, head to the “Phone Transfer” section to choose the “Phone to PC” feature, and tap the “Trust” option on the iPhone.
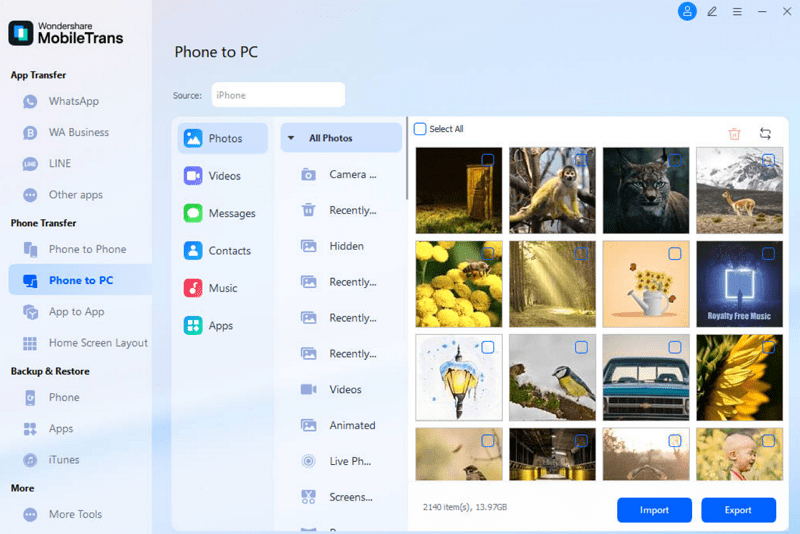
Step 2. Determine the iPhone Data and Export
Now, pick the data you want to export from iPhone, press the “Export” button, and wait until the process ends.
Method 2. Via USB
You can also try a USB connection as it’s fast, doesn’t require internet, and works with simple plug-and-play access. When sharing data using the provided guide, USB transfers preserve original file quality, support all file types, and even charge your iPhone during the process.
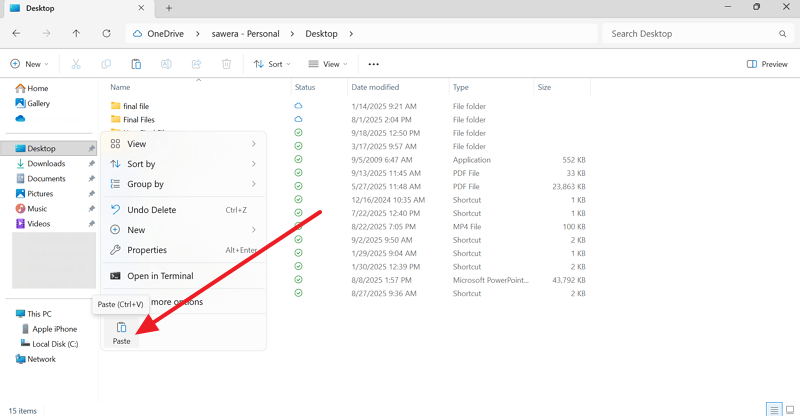
Step 1. Connect the devices, then in File Explorer, select the iPhone and choose the data you want to move from internet storage by pressing the “Copy” button.
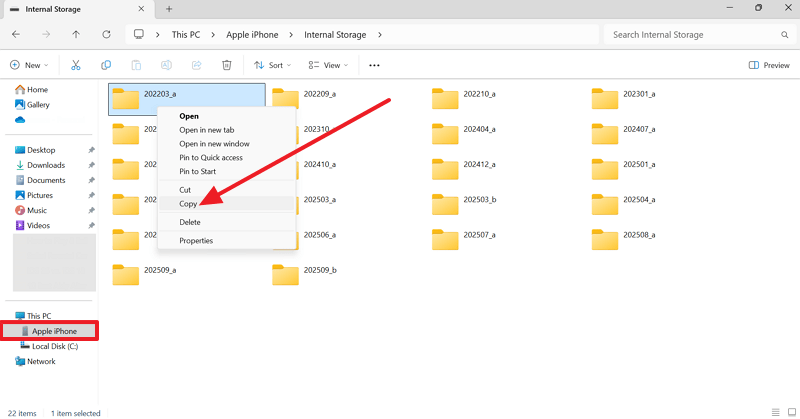
Step 2. In the chosen folder, paste the copied file by selecting the “Paste” option after right-clicking.
Limitations
- Data migration may stop if the iPhone sleeps, locks, or the cable fails.
- Transfers need unlocking, permissions, and trust prompts to work.
Method 3. Use iTunes
When learning how to transfer files from iPhone to PC, you can also use iTunes, which syncs music, videos, books, podcasts, photos, and even app files between iPhone and PC. iTunes also preserves original quality, metadata, and organization during transfers, and can be accessed easily via guided steps:
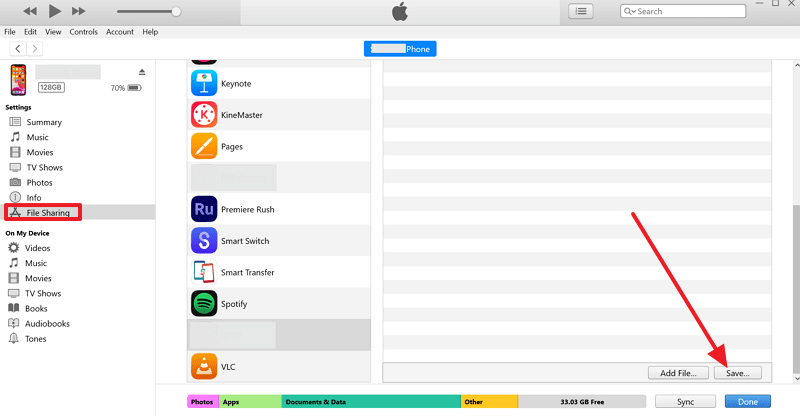
Instructions: After connecting the iPhone, go to the “File Sharing” tab on iTunes and select the app from which you want to export the file. Press the particular document, and scroll down to choose the “Save…” option.
Limitations
- Works only with apps supporting iTunes File Sharing.
- You have to first add the desired files to the app folder in the Files app.
Method 4. With iCloud
To transfer files from an iPhone to a PC, iCloud provides automatic backup, cross-device access, and secure, encrypted storage with two-factor authentication for privacy. Unlike cables, it supports many file types and works on iPhone, iPad, Mac, and even Windows or browsers, as shown below:
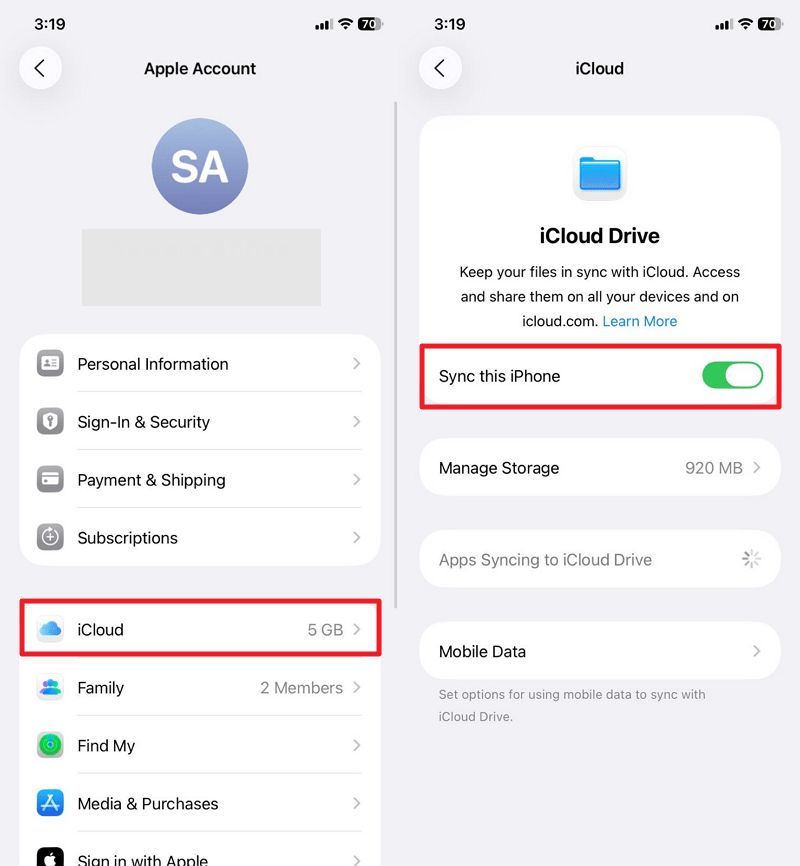
Step 1. Access the Apple ID settings, pick the “iCloud” option, and ensure “iCloud Drive” is enabled. Afterward, add the desired file to iCloud Drive by tapping on the “Share” option and choosing “iCloud Drive” from the Files app.
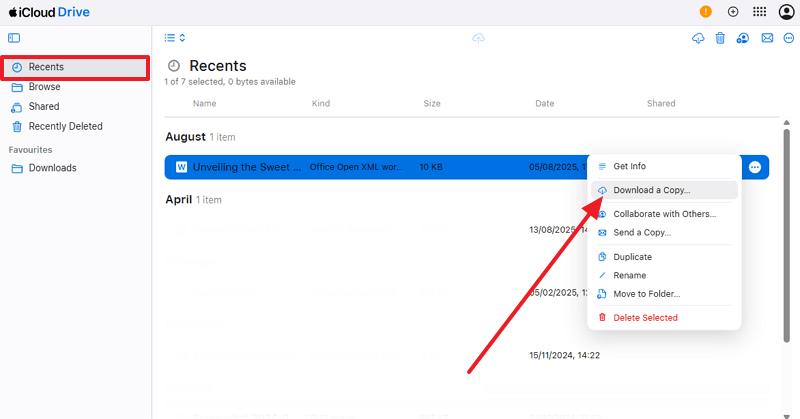
Step 2. Pick the uploaded file on iCloud drive as you sign in and tap the “Three Dots” icon to pick the “Download a Copy…” option from the “Recent” tab.
Limitations
- Only 5GB free, quickly fills with backups.
- Internet-dependent, large files transfer more slowly than USB.
Method 5. Using Email
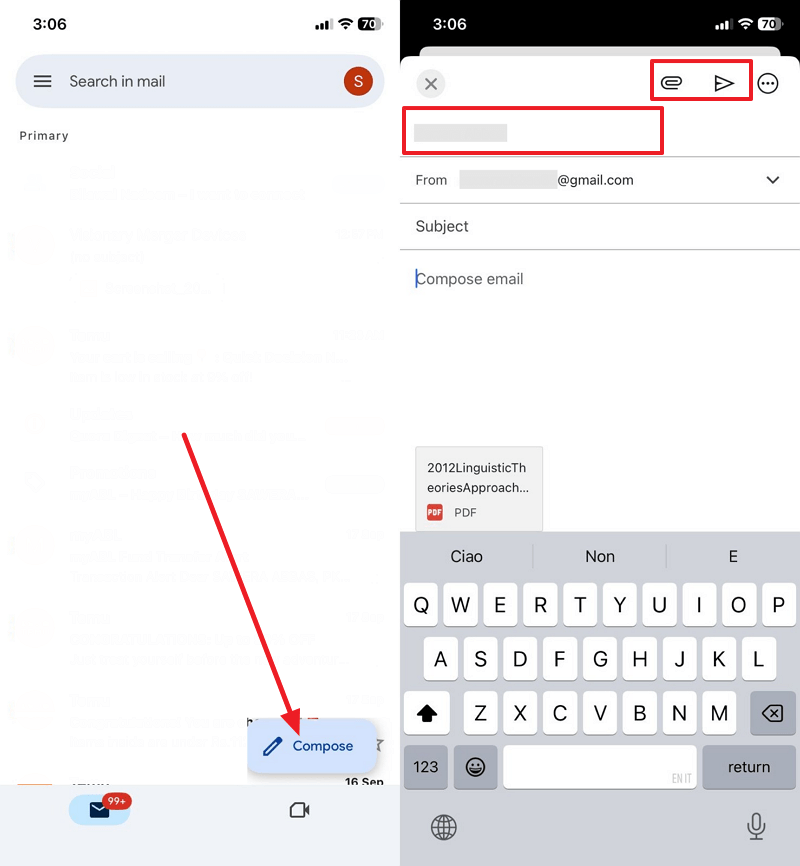
For iPhone to Windows file transfer, use email as it’s an easy and universal way to move data and requires no cables or extra apps. Additionally, files can be accessed on any device with internet once shared by following the given steps:
Step 1. From iPhone, hit the “Compose” button, attach the file, enter the receiver’s email, and tap the “Send” icon.
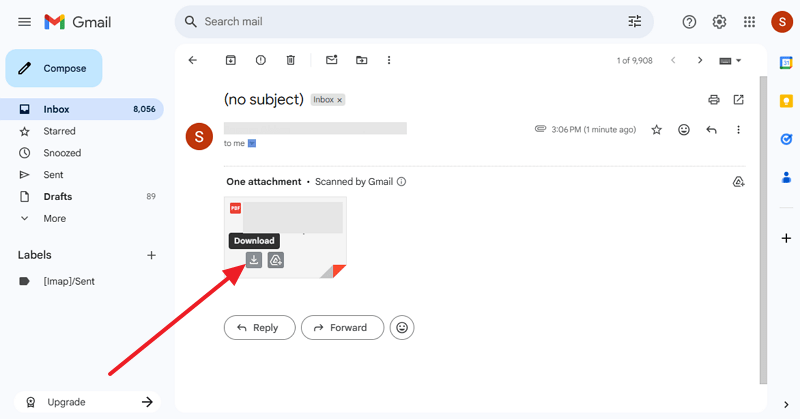
Step 2. Go to the received mail on PC, hover over it, and choose the “Download” icon.
Limitations
- Most emails limit attachments to 20–25MB, blocking large files.
- Attaching many files manually is slow, inconvenient, and impractical.
Method 6. With Google Drive
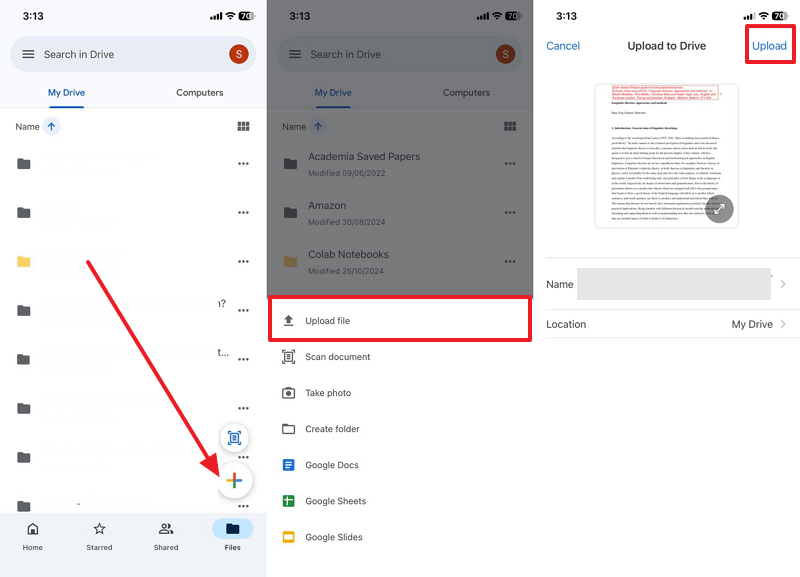
You can also make iPhone to PC file transfer possible with Google Drive, as the process is wireless and can be performed cross-platform. With 15GB of free storage, it offers more space than iCloud and makes file sharing easier, as shown below:
Step 1. Tap the “+” icon, choose the “Upload” button, and browse the file to share by pressing the “Upload” button.
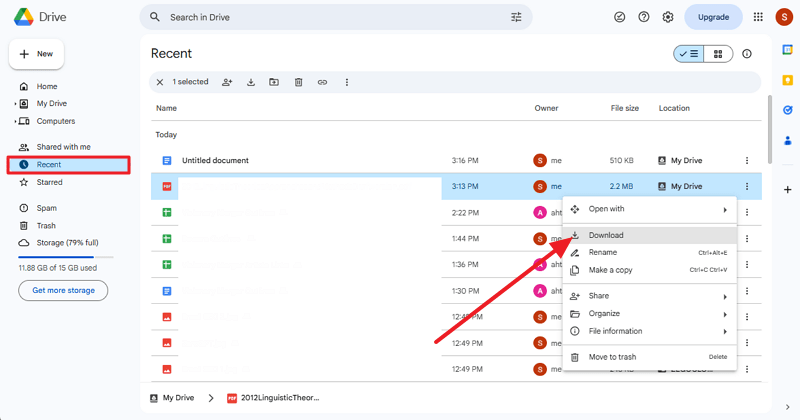
Step 2. On PC, head to the “Recent” tab, press the “Three Dots” icon, and choose the “Download” option.
Limitations
- Requires stable internet; poor connections cause delays and failures.
- Risk of accidental data leaks through misconfigured sharing links.
Conclusion
Summing up, this guide has explored various ways to transfer files from iPhone to PC with a detailed guide and its cons. Among all, we suggest using MobileTrans as it supports multiple data types and can be used by any user. Beyond its simple interface, MobileTrans offers faster transfer speeds, compatibility across devices and operating systems, and zero data loss risk during migration.

